


After sharing with you my DIY Nail Polish Wall last week here I promised to show the rest of my stash. Still quite vast but sadly I haven't got the storage full worked out just yet... though my upcoming Ikea trip may solve that!
Currently with the excess nail polishes that don't fit on my nail polish wall/aren't special enough these are placed in brand order in beauty boxes from pass beauty box subscriptions. Then lined up on the floor under the nail polish shelves so I can see exactly what I have. Tools and duo nail polishes are placed in various pots and nail care and nail art again are placed in beauty boxes and larger gift boxes.

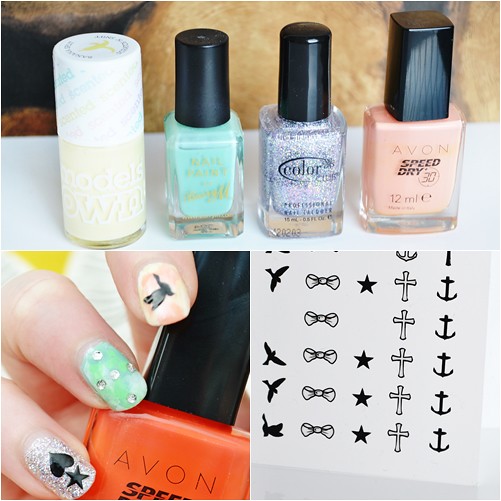
First up is my most used box,this contains everything I need to prep my nails with for nail polish and removing nail polish. It's slightly hard to see but I have a beauty box placed into a larger Ted Baker gift box just to give different sections. At the left side and bottom of the box I have nail polish removers - Ciate Mint Chocolate Remover and Bourjois Magic Nail Polish Remover pot as well as my trusty Lanolips Rose Balm for Hands & Nails and a small Paul & Joe makeup bag containing cotton wool pads.
Next is the left side of the smaller box which holds my favourite nail care products. A handy Multi-Way Buffer from Models Own, Burt's Bees Lemon Cuticle Cream, Stylfile Nail File, Ted Baker Nail Clippers and a mini L'occitane Shea Butter Hand Cream. I also have some cute mini nail files for my handbags as backups and some travel nail polish remover swabs that are ideal for touch ups. Down the centre I have lots of top coats and a few base coats. Top coats from - Seche, NYC, Essie, Ciate and a matte top coat from Models Own. Favourites have to be Seche Vite and NYC Fast Drying one. As for base coats I have a now gloopy Essie base coat and China Glaze Ridge Filler Base Coat that I absolutely love and use before every manicure.

Ahhh my nail art box! This is one of two boxes but I decided not to show the other one as it's much bigger and one you have to dig about in to find what you want! This box contains newer nail art that I want to try out or have to hand. Nail Polish wheels are essential for me for nail swatches, I get these from eBay super cheap. Next to that I have a stash of new nail art pens- I'm forever trying out new ones.
At the top of the box you can see lots of interesting bottles of glitter which are again from eBay, must show these VERY soon as they were such a bargain. Under that is a large bag of matte gold hexagon glitter pieces that I still haven't got around to trying out... but I really should as I love the look of matte glitter - so chic! At the bottom right of the box I have a few pots of messy loose glitter from Models Own and Avon... the Avon Holographic glitters are amazing!

A box of minis! I love my mini nail polishes - perfect for travelling with and also ideal for trying out more expensive brands such as OPI, Nails Inc & Essie.
Favourites here have to be my mini Essie nail polishes (note to self - buy more!) and OPI minis... the 4 in the top corner where from the Designer Series which was an amazing holographic collection. Also have so many Ciate minis from the Advent Calender last year, so many perfect colours for spring and a few fun loose sequin, caviar and glitter minis which are quite special!

As I create nail looks for the Avon blog I like to keep all my Avon polishes together and in order of collections if I can. Really love the Speed Dry nail polishes as they come in such vivid summer shades but I'm also loving the new Gel Colours which are hidden away in the boxes! Also have all the Color Trend Glitter nail polishes which are really great.
You can find all my nail posts on the Avonfabulous Blog here.

Other bits and pieces are placed in various DIY tumblers that I created a DIY post on here. I love how holographic holders look so have 6 of these with various nail polishes and brushes in. In the above pots I have a few duo nail polishes from Model Own, which I love and one from Kiko. In the other pot I have a mixture of nail dotting tools from eBay, Sally Hansen nail art pens plus a few Extra Fine Sharpies, again for nail art.
For now my nail collection is organised however a larger unit for everything would be ideal. I have my eye on the Ikea Helmer Drawer Unit in white here which is a fairly cheap option.
I'd love to know how you store the bulk of your nail polishes or makeup for other ideas before my trip to Ikea!
Fee xo.
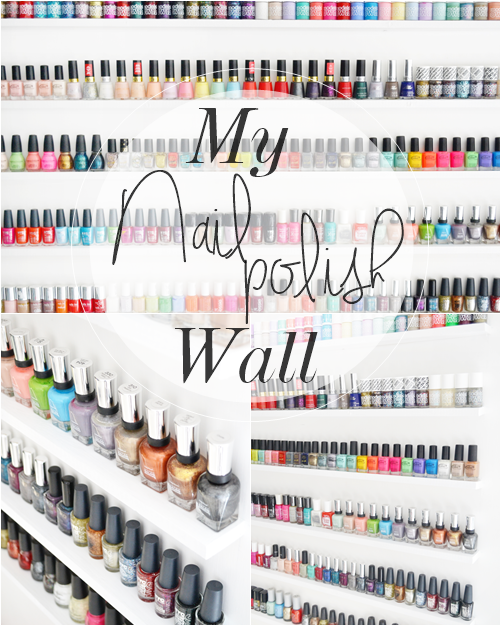
Finally I get to share with you my nail polish wall!
This post has been a long time coming as I stalled on painting the shelves and organising all my nail polishes... well I say all, but I could have done with another shelf or two it now seems?!
I thought I would share with you this part of my makeup room so you can mainly swoon with me at the prettiness! But also to inspire a few of you looking for a good nail polish storage solution. This was a total DIY project that cost only £30 to make and is fairly simple to do.
However if a DIY project isn't for you but you like the look this gives, you can opt for Ikea Ribba Picture Ledges (£8.25 each here) which are just a little shorter (by 7cm) than my own DIY shelves.
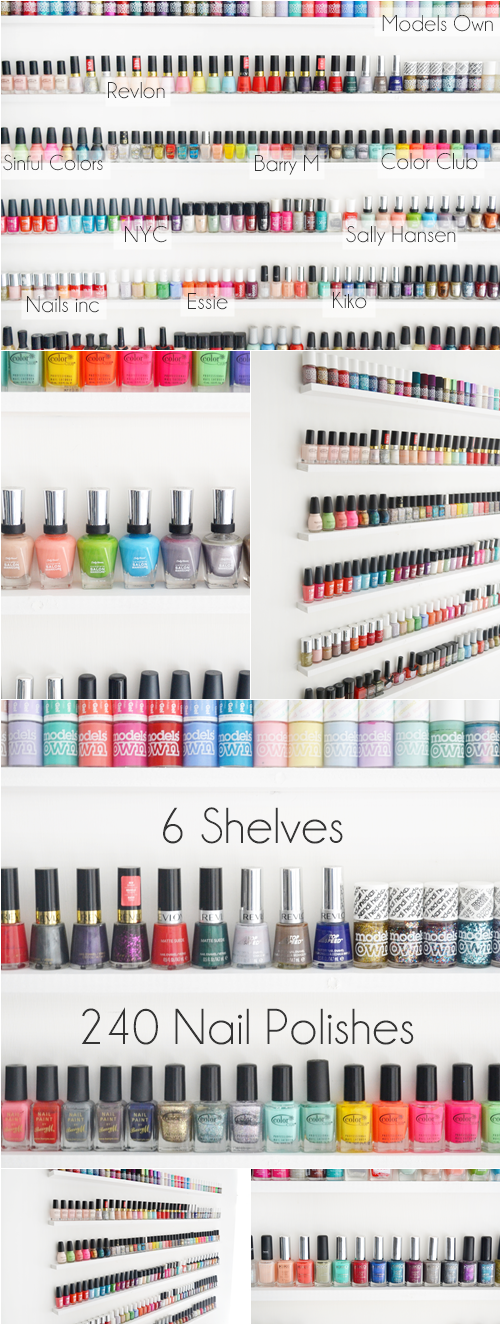
To create the shelves you do need some DIY expertise but it definitely is a simple enough project. You will need unpainted wooden batons of your desired length from a hardware/DIY store (the ones I purchased were 122cm and of course deep enough for a nail polish to sit on it), a drill, a spirit level and pencil, long screws, wood filler and satin wood paint.
HOW-TO
To start I would suggest pencilling where you want the shelves to go by using a spirit level and tape measure to make sure the shelves will be straight and evenly apart. This will take some time but you need to get it correct! Next you want to drill the front of the batons to the wall using 3 long screws for each. This is easier to do on a structural wall than a studded wall so you should keep that in mind when deciding where you want the shelves. Once they are up you will need to take some wood filler and fill in the screw holes, using a knife or wallpaper scraper to make it flush with the wood. Then all you have to do is paint them! This makes it sound quite simple but it actually is. You just need to make sure you hold the batons level and to go slow as you are drilling as you will be going against the grain of the wood and don't want to split it.
I'm so pleased with how the shelves turned out and can't believe they hold so many nail polishes! I was tempted to organise them in colour order however for ease I decided to place them on the shelves by brand.
Another nail storage post to come soon on the rest of my nail polishes and nail art and nail care supplies!
Fee xo.

Yesterday I spotted the NPW Nail Art Stud Wheel was a bargainous £1.20 on ASOS here so I thought I'd dig it out of my nail art stash and create some mix and match nails with it. I bought the wheel at full price which was only £3 and I thought that was worth it... so I couldn't not share such a bargain!
First up the nail wheel itself. This contains 12 compartments that hold 11 different types of gems, studs and pearls, totalling over 500 pieces. Making this a great buy for trying out different types of nail art for either mix and match nails or to see what you like best (I'm definitely going to be heading over to eBay to stock up on some silver studs now).
As for how fiddly the pieces are to get on the nails I would recommend a white wax crayon for picking up the gems/studs to place on to the nails accurately or long tweezers that are specifically for nail art.

As for my nails I decided to go for a soft look that were mix and match just to play around with the different pieces in the wheel. For once I decided to go for quite sheer nails with Bourjois Rose Lounge to make the nails look delicate, but I couldn't resist an accent nail so Rimmel Stardust in Aurora it was with quite a thick coat of Essie Let it Shine Top Coat to give it a glossy finish.
When it came to application of the studs and small beads I found applying a thin layer of top coat over the nail the best option, leaving it to go slightly tacky. For the accent nail I decided to keep it simple with a single pearl bead, as the glitter nail polish was enough focus. Then for my index and little finger I decided to use silver micro beads, though I definitely prefer how I have spaced them out on my little finger. As for my middle finger I decided to try out the silver studs which I feel really make the nails stand out.
The nail art wheel is such a good way to get creative with nail art and just a total bargain at £1.20!
Fee xo.

As today is Valentine's Day I thought instead of just showing you regular swatches of the new Models Own HyperGel collection I would incorporate some Valentine's Day nail art into the mix.
Firstly let me just express how excited I am for this range - 10 Gel-like nail polishes without the hassle/process of gel application but with the hi-shine and coverage and all at the normal price of £5 each! Models Own really have produced a quality collection here with spot on shades for Spring/Summer 2014.
Full swatches and details of where you can buy the HyperGel collection at the
bottom of the post.
bottom of the post.

Models Own Naked Glow Hypergel
£5.00 here
First up one of my favourite shades from the range! Naked Glow is a perfect soft beige that reminds me more of a paint shade than anything else. But as it's such a soft shade I knew it would look perfect alone but also as a base for all nail art... I actually cannot wait to wear it with gold nail art studs adorning each nail.
Unfortunately as most of the nail art covers the Hypergel nail polish you can't really see the shine from this but like all the shades in the collection this really doesn't need a topcoat. This is also a perfect two coat nail polish, though I did in fact get away with one coat here! A beautiful shade that has to be up there with Models Own 'Utopia' for being such a serene shade.

Model Own Pink Veneer
£5.00 - here
Another shade I was drawn to that I could instantly see working well with Red Lustre (the vivid red from the collection). Though not as opaque as some of the bright shades (taking 2-3 coats) this baby pink definitely makes up for it in the shine department giving such a hi-shine finish. I could see this looking amazing come spring/summer especially with pale skin tones.
Here I decided to create some very quick heart tipped nails by painting the top of a heart to each nail tip by sweeping the brush in an 'M' shape. I then decided to decorate each heart with dots using White Light (the white from the collection) and a dotting tool.

Swatches left to right - Coral Glaze, Blue Glint, Cerise Shine, Turquoise Gloss, Red Lustre, Cornflower Gleam, Lilac Sheen, Naked Glow and White Light.
Favourites - Without a doubt Naked Glow as I love soft nude shades and Lilac Sheen as it's such a perfect lavender shade for spring.
Least liked - This would have to be White Light as the 3 coat coverage was a bit underwhelming and I don't feel a white wasn't that needed in the collection.
If you could only buy two shades (2 for £8 at Boots) - Naked Glow, reasons above and Red Lustre as it's such a vivid red with a perfect hi-gloss formula.
Release Dates
The HyperGel collection is now available to purchase online from the Models Own website here or from the two UK Models Own Bottleshops. Boots will be starting to stock the collection from 19th February then Superdrug there after on March 12th. All priced at £5.00 each.
More nail swatches from the new collection to come next week!
Which shades do you like the look of?
Fee xo.

As Halloween is just around the corner I thought I'd sit down and create some quick Halloween nails.
I literally grabbed the nail polishes I needed and the Avon Nail Decoration Tool which is a dotting tool and nail art brush in one and gave myself this mismatch Halloween manicure in under 10 minutes. My favouritee design has to be the dripping blood nail art but I really think the mix and match look really works - really vibrant and fun!
Here is how I created each nail...

1. Brain Nails - This is basically a more messy leopard print design using a dotting tool. Just longer splodges and closer together. I did this really quick but you could use a smaller dotting tool and make the design more detailed. (Polishes Used: Avon Reddy To Go and Avon French Manicure White)
2. Tiny Spiders Nails - To create this nail I added a few dots and then added the legs with the nail art brush. Very simple to do. (Polishes Used: NYC Spring Street and Avon Rapid Black)
3. Dripping Blood Nails - I wonder how easy it was to create dripping tip nails but discovered it was so simple. Just add 3 or 4 dots near to the tip of the nail with a dotting tool and then fill in with more nail polish on the dotting tool. (Polishes Used: Avon French Manicure White and Ciate Mistress)
4. Frankenstein Nails - This was simply done with a nail art brush, pretty self explanatory. To make this even easier you could even use a fine liquid eyeliner pen... but remember to add a clear top coat so it doesn't wash off! (Polishes Used: Sally Hansen Grass Slipper and Avon Rapid Black)
Hopefully this has given you a few ideas to sport some fun Halloween nails this week!
Fee xo.
Hopefully this has given you a few ideas to sport some fun Halloween nails this week!
Fee xo.

Next series alert! I thought a change of season called for a new blog post series and I'm seriously looking forward to this one.
As I'm sure you all know I love my nail art so I thought I would create a series of 'Inspired by' nail art posts and this is my first one... nails inspired by a £1,330 D&G dress!
According to Net-A-Porter dark florals are a key trend this Autumn so this dress seemed the perfect fit for my first inspired nail art attempt. I was also inspired by how the floral design bordered the dress and knew that could be translated on to the nails easily.

I also knew a steady hand and a fine nail art brush would be needed to create the detailed floral design however I really didn't expect them to turn out as well as they have! I must admit I am pretty pleased with them for a first attempt!
Here is a run down of the nail polishes I used and how to create the D&G inspired nail art...
1. To start I applied two coats of Avon Speed Dry nail polish in Rapid Black and waited until my nails were totally dry.
2. Next I mixed a little Ciate Paint Pot in Mistress with Avon French Manicure in White to create a pink shade on a sheet of tin foil (so the nail polish stays wet) and also a blob of both nail polishes individually.
3. Then taking a precise nail art brush (I used the red tipped nail art brush from this set here - £2.58 for 6 brushes, eBay) I started to paint on the flowers nail by nail. For the larger flowers I started with the white shade then added red to the center and for the small flowers I started with the pre-mixed pink and added white and red where I felt it needed it. My nails may look detailed but at this stage it's just about creating small blobs.

4. Leaving the basic flower pattern to dry I then mixed Revlon Minted with a small amount of Avon French Manicure in White, again on a pieces of tinfoil.
5. Taking the same nail art brush (of course cleaned with nail polish remover) I picked up the smallest amount of the pre-mixed light mint green shade and painted on the leaf detail next to random flowers. Having little on your brush for this really does help with the slightly streaky effect.
6. To finish off the flowers I dotted the center of each with Avon Rapid Black on the tip of my nail art brush. For the larger flowers I added a few more small dots.
7. As with all nail art a glossy top coat diffuses the lines slightly so I went for my favourite - Seche Vite Top Coat (mini bottle - £2.80 eBay here) to complete the manicure. Which prevents chipping and gives the nails an ultra glossy finish!
Hopefully I've explained it well enough if you are wanting to re-create these nails but from next week I will be making sure I do a step-by-step tutorial with images.
Speaking of next week I have already found my high end fashion inspiration in the form of a bag and it's a fun one with shades perfect for autumn!
Looking forward to this nail art series already!
Fee xo.

I recently asked on my current giveaway what you'd like to see more of on Makeup Savvy... and a lot of you responded with nail art/nail posts!
So I thought I would attempt to do a few doodles on my nails and create some simple seashell nail art today.
Now I know some of you will be thinking "this is easy nail art?" but trust me this is pretty simple and doesn't need to be neat, in fact I purposefully made it not that perfect. Also you can use either a Muji 0.38 Gel Pen (which I highly recommend), a felt tip eyeliner or a standard nail art pen.
Also the beauty of these nails is you can make up the seashell pattern as you go, but if you mess up you can just make the line thicker to hide the mistake or change the pattern slightly.

To create the simple seashell nails...
I firstly started by applying two coats of Avon Nail Experts French Manicure White from the French Manicure Kit (Avon - £6.50 here) and then a coat of Seche Vite (Amazon - £5.79 here). I use Seche Vite before doing any nail art as I find it really sets the nail polish solid.
Next taking my Muji Gel Ink Pen (Muji - £1.00 here) I simply started at the base of each nail with a semi-circle and then created different patterns up the nail. As you may be able to notice the pattern does match with my little finger being the same as middle finger and my ring finger being the same pattern as my index finger. This is so I didn't have to come up with more patterns but to still look like they are all slightly different.
To finish I added another coat of Seche Vite and also decided to add a bit of glitter using OPI Coronation from the Designer Series collection, with my smallest Dotting Tool (set of 5 x 2 way dotting tools from eBay - £1.56 here). Placing a few dots over the dots on the pattern and adding a bit more polish to my dotting tool and filling in the semi circle at the base of each nail.
Whether you use a simple gel pen, a liquid eyeliner or nail art pen these are fairly simple nails to create and can be done with any colour base coat!
Fee xo.

With summer festivals such as V and Creamfields and many others yet to come I thought I would create some mix and match festival nails today!
I love mix and match nail art as they are fun to create and look really good! However I've also added an idea for more easier nails that will literally withstand anything and last right through your festival experience without chipping.
Firstly to create the watercolour/marble base I used this technique here that I like to call No Mess Watercolour Nails. Here I have gone for more pastel tones, whereas in the tutorial you can see I used much brighter colours - this is totally up to you!
Then as these are festival nails I added a coat of Seche Vite (£5.48 - Amazon here) to really give them lasting power. Then left them to fully dry... though with Seche Vite that doesn't take any time at all... I really do get the hype of this top coat now!
Next using the Nail Art Tattoos (full review post here) which are £5.99 for 60 stickers from Boots or Urban Outfitters, I added a few to various nails. These are so easy to use and just need to be sealed onto the nail with another coat of Seche Vite or top coat.

For my middle finger I added four Nail Art Crystals from Girls With Attitude that cost £3.00 and can be found in various Top Shop & River Island stores. Also for my little finger I decided to apply a top coat of L'Oreal Color Riche Coffetti Top Coat which can pick up in Boots, Superdrug and most supermarkets for £4.99. You can see lots more ways to use the confetti top coat here - I really do love it!
As for my other nails and ring finger on the mix and match nails I used 2-3 coats of Color Club Magic Attraction which is my favourite holographic nail polish. You can find similar from China Glaze & Nubar or for a cheaper option look at Gosh or SEVENTEEN on the high street.
If you are looking for long lasting nails that will last you over the weekend or more I highly recommend a glitter or holographic nail polish with two coats of a good top coat. Also make sure to seal the tip of the nail with the top coat as well to really prevent chipping.
Really hope you like these nails!
Fee xo.

A while ago now I posted a nail of the day with some watercolour nails for spring (full post - here) and I promised to share a tutorial on them as the technique is so quick and easy to do - so here it is!
The great thing about this watercolour technique is that it doesn't require water or any nail art tools. Plus there is minimal clean up, in fact I didn't need to use any nail polish remover with these nails.
Another great thing about this technique is any nail polish combinations can be used. Here I used two shades of blue nail polish but you could definitely go for a multi coloured effect with more nail polishes.

As you can see you don't actually need many products for these nails. My only tips would be to use thin plastic bags, I would say you need two maximum and you can even cut them into rectangular pieces that are double the size of your nails to make things a bit easier.
Also I would suggest using an old top coat as you need to apply it while the nails are still wet to get the best effect and that can make the top coat in the bottle a bit cloudy.

Step 1 - Apply a few dots of your chosen nail polishes on to the nail using the nail polish brushes. Tip: I find it easier to open all the nail polishes I will be using first.
Step 2 - Taking your plastic bag you want to place a corner/section of it over the nail and lightly press down. As the sandwich bag is clear you will be able to see how far to the edges of the nail you are with the nail polish, so that you can press down a little harder is certain areas to spread the nail polish about.
Step 3 - Simply peel off the plastic bag and apply a clear top coat over the wet nail to merge the shades together more Tip: With the used part of the plastic bag simply fold it over while the nail is still wet so that is adheres and you don't get nail polish all over your hands.
As you do need to be quick so the nail polish doesn't become tacky this is 100% a do-one-nail-at-a-time jobbie. But it is simple and easy to do meaning it doesn't take any time at all and you can do the other hand without too much of a struggle!

But you don't need to stop there if you want extra summery nails! Just wait until your nails are fully dry and repeat the process with different coloured nail polishes. For my index finger I used Models Own Ice Neon in Bubblegum (I love how neon shades look over this), middle ringer I used Nails Inc Hampton Court Palace Gardens, ring finger China Glaze Wicked Style and little finger was Models Own Ice Neon again in Toxic Apple.
Then to finish off I applied a clear top coat to merge the shades and to make them look super glossy. Of course if you do have excess nail polish on the cuticles or skin then pour a little nail polish remover into the cap of the remover bottle and dip a cotton bud or nail art brush into it and remove it all that way.
I think creating this nail tutorial has convinced me I need to do a lot more tutorials for spring/summer.
Hope a few of you will give these nails a go!
Fee xo.

Models Own are coming at us thick and fast with their new products at the moment!
Their newest additions are the Artstix Nail Beads which I'm sure many of you will be happy to hear are available to buy right now - you can find them online here, at the Westfield Bottleshop and in Boots stores from today.
The Artstix Nail Beads come in 5 different shades, all priced at £4.00 each and include a world first: neon nail beads, which really are amazing!
As you will see below there are so many ways to get creative with these beads. You can of course cover every single nail with the nail beads or go for an accent nail. You can also use them as singular micro beads for a polka dot look, you can even scatter them across the nails or you even mix different colours of beads together!

The new range consists of - Gold Fizz , Black Fizz , Orange Fizz , Green Fizz and Pink Fizz which come in smaller glass bottles than the Model Own Polishes. Each bottle has a screw top and a small opening so you can pour out the bead on to the nails.
The instructions for use on the packaging are very straight forward. You simply paint your nails and while they are still wet you pour or place the beads on the the nails and lightly press down. However I decided to paint my nails and then once they had dried apply a clear top coat. The reason for this is if I applied too much nail polish to my nails and then pressed the beads lightly on to my nails I knew there would be a chance of the beads sinking into the nail polish or smudging it. Also by using a clear top coat you can apply it to an area of the nail so they only stick to that part.
Once your nail polish has fully dried the nail beads really do stay in place which did impress me as I was expecting them to catch or fall off around the tips within an hour or so. However due to them being so lightweight they stayed put without the need of a top coat.

Here I have tried out two different nail looks. For my first attempt at using the Models Own Nail Beads I used Gold Fizz on my ring fingernail as as accent/statement nail and painted the rest of my nails with Models Own Jade Stone. I wasn't sure how well the beads would cover so I used a gold nail polish as the base (this totally wasn't need as I found out) and then I applied a clear top coat and poured on the nail beads. There were a few gaps, but using the side of a pair of tweezers I simply pushed the beads in to place to cover the spaces. I also used the tweezers to push the beads slightly around the edges so it gave a really neat finish.
For my second nail look I applied two coats of Models Own Snow White and a clear top coat and then simply scatters the Black Fizz Nail Beads onto each nail. This was super easy and of course you use less beads this way. I do however wish with this look I had mixed in a few different colours of nail beads in there with the black.

I also decided to try out a few ideas I had for the nail beads on a nail wheel instead of applying and then removing my nail polish constantly! As you can see I tried out 5 different looks with all of the beads in the collection.
I think my favourite idea has to be using the beads as singular beads (second in from right). It does take a steady hand but placing the beads spaced out gives a totally different use and look to the beads. I really cannot wait to try this out with the gold nail beads over light nude nails. Which nail look do you like the most?
So far I really am impressed with the quality and shades of the new nail beads and how they create such a different look on the nails. However as I am fair with all my reviews there is a down side to the beads, and that is how messy they are! Not really messy is the normal sense but even if you place a dish under your nails to catch the excess beads it is then impossible to place them back in the bottle. The packaging does show a miniature funnel being used to place the beads back into the bottle but this doesn't come with the nail beads so really what is there to use?! I did try to create a small funnel with a piece of paper however it just didn't work. So you can either attempt to place the excess beads back into the bottle and reate a bit of a mess or you just waste them by throwing them in the bin.
Overall I am really liking the new Artstix range (you can find my post on the Artstix Duo Polishes here).
What do you think of the new Artstix Nail Beads?
Fee xo.

Last week I posted a nail of the day of the wonderful L'Oreal Confetti Top Coat (here) which like myself you all seemed to love!
As it's such a lovely top coat I thought I would try out a few ideas with it and realised you can achieve so many different looks with it. So here are my 5 favourite looks using the top coat. Hope you like them!
As it's such a lovely top coat I thought I would try out a few ideas with it and realised you can achieve so many different looks with it. So here are my 5 favourite looks using the top coat. Hope you like them!

I wasn't sure what to call these nails at all as they are just the reverse of glittery tips but with the L'Oreal Confetti Top Coat. For this I used the wonderful Color Club Blue-Ming and then instead of painting on the top coat I dabbed it slowly along the bottom of each nail close to the cuticle and then lightly swept over it with a clear top coat to smooth out the confetti and bring it up the nail slightly. I love the colour combination here but this would also look lovely with nude nails I think.

An ultra simple idea with matte confetti nails. Here I used my favourite matte top coat - Models Own Pro Matt Top Coat but I have heard the Rimmel Matte top coat is also quite good. This just gives a different look to the nails and I think it looks best when applied over quite a bright colour with the Confetti Top Coat over the top.

For these nails I decided I wanted a messy ombre look with the confetti nail polish just on the tips. I actually think these nails look like speckled feathers which is quite nice. To do this I dabbed on the black (Rimmel Black Cab - my favourite black) with a cut up makeup sponge, making sure to build up the opacity. Then I lightly painted the Confetti Top Coat on to the tips of the nails. Another very simple nail look which looks like you have made an effort with your nails.

I love Jelly Sandwich nails and I'm so pleased with how these turned out. I simply applied two coats of Kiko 209 as the base nail polish, then a single coat of L'Oreal Confetti Top Coat and then finally another thin coat of the Kiko 209 nail polish over the top. Very simple to do but it gives a different look to the Confetti finish.

These would have to be my least favourite nails just because the mixture of the gold base (NYC Full Metal Jacket - £1.79) with the multi glitter (Models Own ASOS Party Pieces - £4.00 here) and the confetti top coat all seems to clash. In hindsight I would probably have been better with a none shimmery/metallic base nail polish to let the glitter and confetti be the focal point of the nails. I will however be trying out these nails again but with a nude base.
The L'Oreal Confetti Top Coat £4.99 is still a little tricky to get hold of though it is available on the Boots website (here) and it is worth looking anywhere with a L'Oreal stand - Boots, Superdrug, Tesco etc.
Fee xo.

Easter is here and a lovely long weekend, which hopefully means lots of Easter egg eating, movie watching and general relaxation.
To get myself in to the spirit of Easter now that I am an adult and sadly don't receive 10+ Easter eggs anymore I thought I would come up with some simple Easter Egg nails!
I decided to use the new Models Own Fruit Pastel nail polishes (£20 for all 5 from Models Own here or £5 each in Boots) as they are just the perfect shades for spring and create a really nice base for nail art when using all the shades. I actually only just realised that there are 5 nail polishes in each Model Own collection so you can actually paint each nail a different colour. I wonder if this was Model Own's idea in the first place? Probably so.

To create the nails you will need lots of different pretty pastel nail polishes, a dotting tool/hair grip and a nail art striping brush or a thin eyeliner brush.
With all nail art I find leaving the base nail polish colour to fully dry is so important to be able to paint on the nail art easily. So I painted my nails with the Models Own Fruit Pastel nail polishes and then left them to completely dry for 30 minutes, of course getting on with other things.
- First on each alternate nail I created polka dots in different colours. If you don't own a dotting tools using the end of a hair grip/bobby pin will work in a similar way (though sets of dotting tools from eBay are under £2 - here). To create a neat looking polka dot pattern I always start with 4 or 5 dots down the centre of the nail and then place the other dots vertically either side.
- For the more Easter egg looking nails you want to paint two horizontal squiggly lines with a nail art brush. These can be as neat or as messy as you like or even just straight lines if that is easier to do. If you want to change up the colour of the squiggles just make sure to keep a cotton pad with nail polish remover close by to quickly clean the nail art brush.
- Next using the dotting tool again place a row of dots in between the two squiggly lines.
- Finish with a clear top coat or even a sparse glitter top coat for a decorated egg look! I also dotted on Models Own Gold Finger over the central dots as I wanted to make my nails look more fun!

Nail polishes used...
Base nail polishes - Models Own Fruit Pastel in Apple Pie, Grape Juice, Banana Split, Blueberry Muffin, Strawberry Tart.
For the dots - Essie Tour De Finance, Kiko 419(coral), Kiko 422 (turquoise)
For the squiggles - Essie Tour De Finance, Essie Where's My Chauffeur?
Glitter nail polishes -Models Own Gold Finger, Avon Silver Plated
Top Coat - NYC Clear Nail Polish (Favourite clear top coat)
I really couldn't be more pleased with how these turned out. They looks so similar to when you decorate eggs for Easter but also very spring appropriate with the pastel colours. I will definitely be trying to keep these chip-free over the weekend by applying a top coat every day to keep them looking nice.
Hope you all have a lovely weekend whatever you are doing - hopefully eating at least one Easter Egg!
Fee xo.

Another nail art post today as I can't get enough of doing my nails at the moment and I am very much in to easy nail art!
I will admit loose glitter is quite messy to use however these 5 glitters are just amazing and so cheap at only £2.50.
The nail glitter set it actually from NPW which I know probably no one has heard of but actually on closer inspection of their website you would definitely spot some products you have seen in retail shops such as Topshop & New Look. They do the amazing glittery duck lip balms here which I am sure aren't great quality lip balms but look so cute and they also do lots of unique beauty gifts... and of course their line of nail art pens and glitters!

These NPW Nail Art Glitters can be found on the NPW website here or the range can be found in select New Look, Topshop and River Island stores. But if you can't find these specific nail glitters there will be nail art pens or wheels with gems in, that are all just as pretty. I do really wish the fully range was more widely available on line, on say ASOS or in Boots as the products are pretty good! You can find the nail glitters in different colours however on the Topshop website here & here.
The 5 vials of glitter are designed to be sprinkled, pressed or brush onto semi-wet nails then sealed with a top coat. Meaning the options for different nail art are endless. What I really like about these glitters is that there are sequined shaped pieces of glitter and then fine glitter so it looks lovely on the nails, also the shades of glitter are amazing. Plus I did noticed that the excess glitter can be so easily brushed off the skin, which believe me is a huge bonus as so many fine glitters get all over the hands then it seems to be impossible to get rid of.

As you can see I tried using the glitters is two different ways. I first decided to just add glitter to the tips of my nails by lightly pressing the glitter on with an eyeshadow brush, which worked really well. Then I went for an accent nails of gold glitter which I just poured onto the nail and then pressed on.
I do prefer my nude nails the most as I love the colour of the glitter however both nails were so easy to do!
I really do rate this little set! The glitters are really unique and the bottles remind me of tiny bottle of fairy dust!
If you do like them as much as I do then make sure to look out for NPW products in the stores I mentioned above.
Fee xo

When it comes to nail art even for me it can be easy to just stick to using glitter nail polish or a dotting tool. Because lets face it, doing nail art can be fiddly and also someones impossible with your other hand.
However I have finally discovered the easiest pens to use and they come in 3 lovely metallic shades . Yes, they are just Sharpie fine point markers but they just work perfectly.
I've tried various Sharpie pens in the past, some have worked and some haven't. I actually like to use an extra fine black Sharpie Marker quite often for nail art. So when I spotted a 3 pack of the new-ish Sharpie Metallic Markers in Tesco I thought I would try them out. Do not worry though you can also find them on eBay for £4.19 with free p&p - here which is roughly what I paid. The markers come in a set of three consisting of - gold, silver and bronze.

As you can see here I tried out the silver and gold markers with quite good effect. The thing I really like about these pens is that you don't need to shake them and they are opaque meaning you don't need to go over your nail art design at all.
However there are some things that you have to make sure of. The first one is you need to make sure your nail polish is totally dry before using the markers on the nails or it will just drag the nail polish and look awful. Also you do have to use a top coat to seal in the nail art but this is were you can smudge the design so you need to let the Sharpie Marker dry and then with enough top coat on the brush you need to quickly and lightly apply it to each nail. If you drag the polish over the nail a few times it's more than likely going to smudge. But as you can see by my nails you can definitely apply a top coat without smudging them.
I'm just so pleased with my new discovery and can see myself using the pens quite often to add gold tips to my nails and polka dots. But now I can attempt some more complex nail art as it is just like using a pen as the nib works perfectly on the nails.
Expect to see more Sharpie Marker nail art is some up coming nail posts as I have a feeling I will be getting obsessed with using these instead of nail polish nail art pens!
Fee xo.

For the past few weeks I have been seriously lusting after the Illamasqua Speckled Nail Polishes, but at £14.50 a bottle (here) I just knew I couldn't give in.
But then I realised that speckled polishes are very much similar to what nail polish addicts call 'jelly sandwich' nails which is created by sandwiching a glitter nail polish between two layers of a sheer nail polish. So I decided to give it a go!
Now I realise these nails aren't that similar in shade to the Illamasqua nail polishes however I think the new L'Oreal Confetti Top Coat (£4.99 Superdrug here or Boots) with any sheer pastel nail polish would be so similar to the Illamasqua ones. I just need to get my hands on the L'Oreal top coat to try it out.

I decided to go for multi-coloured speckled nails as for the past few days the sun has been shining, which can only mean one thing - Spring is on it's way! Which also means Easter is also near (I may have already consumed one Easter egg already!) and I thought speckled egg nails would look really nice.
How I achieved my speckled nails...
- First I decided to start with my all time favourite base coat, the Essie Ridge Filler (£8.55 Feel Unique here) which really smooths out the nails and acts like a foundation for the nail bed. Really great for older nails or anyone that has ridges due to wearing nail polish too often - like me!
- Next I applied a very thin coat of a nude Color Club nail polish, I don't actually know the name of this, but I do highly rate bother Essie and Colour Club for quite sheer french manicure shades. You really want to go for a nude that is quite sheer with one coat.
- Once that had dried I next applied Technic Carnival evenly over my nails. I absolutely LOVE this polish and it is just so cheap. Amazon - £1.90 free p&p here. Ebay - £1.85 with p&p here.
- I then let my nails fully dry - this is quite an important step as you don't want the glitter to drag off the nails with the next step.
- Next with the least amount of nail polish on my brush I applied the Colour Club nude polish over my nails to create the Jelly Sandwich. If you find the polish is covering the glitter underneath too much, just wipe off the excess onto the bottle neck and sweep over the nail again.
- My nails here are without a top coat but you can add a glossy top coat or even a matte one - Models Own do a great one.

As the nails may have 4 layers of nail polish on them with a base coat or top coat, it is important you let the nails fully dry as there is nothing worse than smudging nails you have spent time over!
What I love about these nails is that you have effectively created your own unique nail polish by just suspending a glitter nail polish between two layers of a creme nail polish and also the finish of the nails is so smooth unlike when you just apply a glitter top coat over a base nail colour.
I'm really impressed with how these nails turned out and now just want to get my mitts on the new L'Oreal Confetti nail polish to try out more combinations!
Fee xo.
Subscribe to:
Posts (Atom)